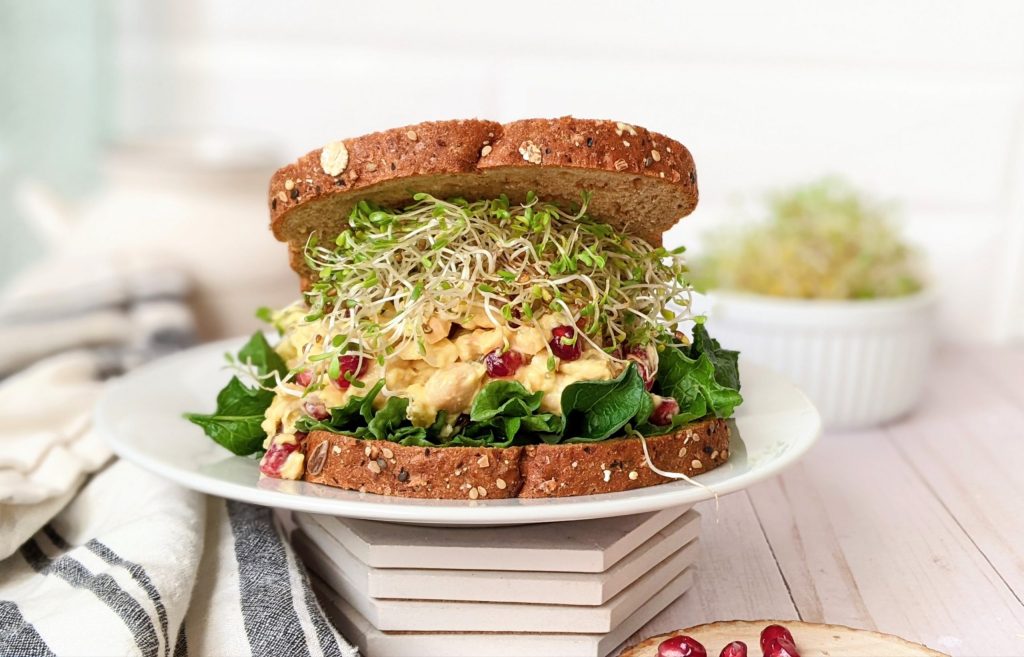
Easy and Tasty Chickpea Salad Sandwich Recipe
**Elevating Your Chickpea Salad: Suggestions and Dill Pickle Variation**
Chickpea salads are an adaptable and healthy choice for meals, providing a substantial foundation that can be tailored with diverse flavors and components. Whether utilizing canned or home-cooked chickpeas, grasping the distinctions of each can enhance your dish.
**Incorporating Cooked Chickpeas:**
When selecting canned chickpeas, it’s essential to recognize that they usually have added salt. To rectify this, mix in a few dashes of kosher salt according to your taste. This guarantees that the flavors are balanced and not excessively salty. Moreover, canned chickpeas often possess a softer consistency compared to those prepared at home. Chickpeas cooked at home may be drier, necessitating the addition of more mayonnaise to achieve the aimed creaminess in your salad.
**Dill Pickle Variation:**
For those eager to introduce a zesty twist to their chickpea salad, the dill pickle variation is an enjoyable choice. To create this version, add the following components:
– ½ cup diced dill pickles: These provide a crispy texture and an explosion of zesty flavor.
– 1 spoonful sweet pickle relish: This element brings a touch of sweetness, counterbalancing the tang of the dill pickles.
– ¼ teaspoon dried dill: This herb amplifies the overall dill taste, offering a fresh and fragrant accent.
– ½ tablespoon chopped dill: Fresh dill heightens the herbal nuances, making the salad more lively.
By adding these elements, you craft a chickpea salad that is not only tasty but also layered with various textures and flavors. Whether savored as a standalone meal or as a stuffing for sandwiches and wraps, this dill pickle variation is bound to be a favorite among many.

Light and Breezy Gluten-Free Chocolate Chip Cookies: A Low-Calorie Treat
Title: Airy and Light Gluten-Free Chocolate Chip Cookies: A Low-Calorie Treat
Introduction
For those adhering to a gluten-free lifestyle, locating the ideal chocolate chip cookie recipe can prove challenging. A considerable number of gluten-free cookies tend to be heavy or crumbly, but there’s no need for concern! This article introduces a recipe for light and airy gluten-free chocolate chip cookies that are not only scrumptious but also low in calories. These cookies are ideal for indulging your sweet cravings without neglecting your dietary requirements.
The Benefits of Going Gluten-Free
Gluten-free diets have gained popularity, not only among those with celiac disease or gluten intolerance but also for individuals pursuing a healthier lifestyle. Gluten-free baking frequently entails the use of alternative flours like almond, coconut, or rice flour, which can provide added nutritional advantages over conventional wheat flour. These flours are generally richer in protein and fiber, enhancing the overall satisfaction and nutrition of the treat.
The Key to Airy and Light Cookies
To achieve a light and airy consistency in gluten-free cookies, several important techniques and ingredients are necessary. Here are some suggestions to help your cookies turn out perfectly:
1. **Employ a Flour Mix**: Blending various gluten-free flours can imitate the texture of wheat flour. A combination of almond flour, tapioca starch, and coconut flour is effective in producing a well-balanced, airy texture.
2. **Add Leavening Agents**: Baking soda and baking powder play a crucial role in enabling the cookies to rise and become fluffy. Be sure they are fresh for optimal results.
3. **Beat the Egg Whites**: Separating the egg whites and beating them to soft peaks before gently folding them into the batter can infuse extra airiness into the cookies.
4. **Refrigerate the Dough**: Allowing the dough to chill for at least 30 minutes prior to baking assists the cookies in maintaining their shape and stopping excessive spreading.
Low-Calorie Ingredients
To ensure these cookies remain low in calories, consider the following ingredient swaps:
– **Sweetener Alternatives**: Use a natural sweetener such as stevia or erythritol instead of conventional sugar to lower the calorie count without losing sweetness.
– **Dark Chocolate Chips**: Choose dark chocolate chips, which contain less sugar and are richer in antioxidants than milk chocolate.
– **Unsweetened Applesauce**: Substitute some of the butter with unsweetened applesauce to reduce fat and calorie content while preserving moisture.
Recipe: Airy and Light Gluten-Free Chocolate Chip Cookies
Ingredients:
– 1 cup almond flour
– 1/4 cup tapioca starch
– 2 tbsp coconut flour
– 1/2 tsp baking soda
– 1/2 tsp baking powder
– 1/4 cup unsweetened applesauce
– 1/4 cup butter, softened
– 1/3 cup erythritol or preferred sweetener
– 1 tsp vanilla extract
– 2 large eggs, separated
– 1/2 cup dark chocolate chips
Instructions:
1. Preheat the oven to 350°F (175°C) and prepare a baking sheet with parchment paper.
2. In a bowl, combine almond flour, tapioca starch, coconut flour, baking soda, and baking powder.
3. In another bowl, cream together the butter, applesauce, erythritol, and vanilla extract until smooth.
4. Mix the egg yolks into the butter mixture thoroughly.
5. Gradually mix the dry ingredients into the wet ingredients until combined.
6. In a separate bowl, beat the egg whites until soft peaks form. Gently fold them into the cookie dough.
7. Mix in the dark chocolate chips.
8. Chill the dough in the refrigerator for 30 minutes.
9. Scoop tablespoon-sized portions of dough onto the lined baking sheet, leaving about 2 inches of space between them.
10. Bake for 10-12 minutes, or until the edges turn golden brown.
11. Let the cookies cool on the baking sheet for a few minutes before moving them to a wire rack to cool completely.
Conclusion
These light and airy gluten-free chocolate chip cookies are a delightful option for anyone wanting to relish a classic dessert without gluten or extra calories. With the right mix of ingredients and methods, you can create cookies that are both fulfilling and guilt-free. Savour these cookies with a glass of almond milk or a cup of tea for the perfect snack or dessert.

Make-Ahead Holiday Snack Recipe That Caters to Every Palate
# Marinated Mozzarella Balls: Simple Entertaining
Prepared in advance and devoured in moments, marinated mozzarella balls are a wonderful enhancement to any event. These tasty morsels can be made the evening prior, allowing entertaining to feel seamless. Present them on festive grazing platters or as a garnish for salads and crostini, and remember to save the delectable oil for dipping!
## Flavor Profile
These mozzarella balls are smooth and comforting, infused with herbal notes, lots of garlic, and a gentle zing from vinegar.
## Serving Suggestions
– Present at room temperature on a **festive board**.
– Use as a garnish for **salads** or **crostini**.
– Package in an **8-ounce mason jar** for accessible gifting, tied with twine and marked with a note to “Keep refrigerated and consume within 2 days.”
## Selecting the Best Ingredients
– **Mozzarella Balls**: Choose bocconcini or ciliegine for bite-sized pieces. Larger balls can be halved, or opt for cubed feta or provolone for variety.
– **Roasted Red Peppers**: Use jarred ones for convenience or create your own for a fresher flavor. Consider adding olives or artichoke hearts for a Mediterranean flair.
– **Marinade**: Extra virgin olive oil delivers rich taste. Both white and red wine vinegar contribute brightness and balance.
– **Seasonings**: Italian seasoning provides a savory foundation. Garlic powder is handy, but fresh minced garlic can elevate the flavor.
– **Variations**: Incorporate red pepper flakes for heat, lemon zest for freshness, or a drizzle of balsamic vinegar for added flavor.
## How to Prepare Marinated Mozzarella Balls
1. Mix the marinade ingredients (see complete recipe below).
2. Pour the marinade over the mozzarella and refrigerate to marinate.
**Tip**: For optimal flavor, allow the mozzarella to marinate for at least 24 hours, turning occasionally. Bring to room temperature before serving to liquefy the olive oil.
## Storage & Leftover Ideas
Keep prepared mozzarella balls in an airtight container in the refrigerator for up to 48 hours. Let them rest at room temperature for 30 minutes before serving.
**Note**: Do not freeze, as this will change the cheese’s texture and oil emulsion.
## Recipe Overview
– **Servings**: 8
– **Prep Time**: 10 minutes
– **Marinating Time**: 1 day
– **Total Time**: 1 day, 10 minutes
### Ingredients
– Mozzarella balls
– Olive oil
– White wine vinegar
– Roasted red peppers
– Fresh parsley
– Italian seasoning
– Garlic (fresh or powder)
– Red pepper flakes
– Salt
### Instructions
1. Place mozzarella in a 2-cup mason jar.
2. Combine olive oil, vinegar, roasted red peppers, parsley, Italian seasoning, garlic, red pepper flakes, and salt in a measuring cup, then pour over mozzarella.
3. Seal the jar and shake well to combine.
4. Refrigerate immediately and marinate for 24 hours, turning the jar occasionally.
### Notes
– Fresh garlic and herbs can be substituted for dried.
– Store the oil for a maximum of 48 hours for safety.
– Sliced fresh mozzarella or cubed pizza mozzarella may also be utilized.
Savor these marinated mozzarella balls as a straightforward yet sophisticated enhancement to your next event!
Cornbread Casserole: An Ideal Festive Accompaniment Straight from the Oven
# Cornbread Casserole: A Heartwarming Classic Crafted from Scratch
Cornbread casserole is a cherished meal that brings warmth and solace to any dining experience. With its soft center and lightly crunchy edges, this recipe offers a delightful way to savor cornbread without relying on a packaged mix. Made with straightforward pantry staples, it’s ideal for both regular dinners and festive gatherings.
## Flavor Characteristics
This cornbread casserole is moist, tasty, and has a hint of sweetness. The mix of creamed corn and cheese results in a melt-in-your-mouth consistency, while the golden-brown topping provides an inviting look.
## Necessary Tools
For optimal results, utilize a **9×13 casserole dish**. This size guarantees that the edges get lightly crisp while the middle stays soft.
## Serving Ideas
Cornbread casserole makes a wonderful side dish for holiday feasts. It complements wonderfully with:
– [Brown Sugar Ham](https://www.spendwithpennies.com/baked-ham-with-brown-sugar-glaze/)
– [Slow Cooker Turkey Breast](https://www.spendwithpennies.com/crock-pot-turkey-breast/)
– [Chili](https://www.spendwithpennies.com/texas-chili/)
## Pantry Corn Enchantment
### Key Ingredients
– **Corn**: The highlight of this dish. Utilize a mix of creamed corn and canned corn, or swap canned corn with 1½ cups of thawed frozen corn.
– **Cheese**: While sharp cheddar is typical, Monterey Jack may also be used, or for a spicy twist, opt for Pepper Jack and incorporate diced jalapeños.
– **Cornmeal**: Crucial for that traditional cornbread taste. Medium-grind cornmeal is suggested for the finest texture.
– **Sour Cream**: Introduces a tangy taste and contributes to moisture. If sour cream isn’t available, full-fat Greek yogurt is an acceptable alternative.
– **Variations**: For a smoky essence, include some cooked bacon and a dash of smoked paprika. You can also add chives or green onions for a savory note, or create a green chile casserole by adding green chiles and cumin.
## How It All Comes Together
1. Preheat the oven to 350°F and grease your casserole dish.
2. In a bowl, whisk the dry ingredients: flour, cornmeal, sugar, baking powder, and salt together.
3. In a separate bowl, combine the wet ingredients: creamed corn, sour cream, melted butter, and eggs.
4. Mix the wet and dry ingredients together, stirring just until mixed. Gently fold in corn kernels and cheese if desired.
5. Pour the batter into the greased baking dish and bake for 45-55 minutes, or until lightly golden.
### Success Tips
– For a more tender texture, allow the batter to rest for 5 minutes before baking.
– Modify sweetness by adding 1-2 tablespoons of sugar and consider including a pinch of garlic powder for added flavor.
– The casserole is finished when the center has slight jiggle and reaches about 200°F on an instant-read thermometer.
– To prep in advance, keep dry and wet ingredients apart for up to 24 hours. Combine prior to baking.
– For a half batch, use an **8×8 casserole dish** and begin checking for doneness around 35-40 minutes.
## Save for Later
Allow any leftovers to cool thoroughly and place them in an airtight container in the refrigerator for up to 4 days. For extended storage, freeze for up to 2 months. When ready to re-enjoy, heat covered at 325°F until warmed through, then uncover for a few minutes to refresh the edges.
## Conclusion
This cornbread casserole is more than just a meal; it’s a soothing classic that can be savored all year round. With its uncomplicated ingredients and straightforward preparation, it’s bound to become a favorite at your table. Relish the cozy flavors and the joy of sharing this delightful dish with loved ones!

Recipe for Scalloped Potatoes Baked
# Scalloped Potatoes: A Timeless Comfort Dish
Scalloped potatoes are a cherished side that is celebrated for its rich, creamy consistency and soothing tastes. Frequently served with substantial cuts of meat, they are a mainstay at family reunions and festive celebrations. Their indulgent quality allows them to be enjoyed on their own, providing a delightful experience of soft potatoes swathed in a silky cream sauce, often crowned with a golden layer of cheese.
## What are Scalloped Potatoes?
Scalloped potatoes fall under the category of gratin, distinguished by thinly sliced potatoes baked in a creamy sauce. The term “scalloped” refers to the dish’s stacked appearance, reminiscent of scallops. This distinct texture, similar to a potato lasagna, is what renders scalloped potatoes so attractive.
## How to Make Scalloped Potatoes
Preparing scalloped potatoes is surprisingly easy, necessitating just a few steps:
1. **Peel and Slice**: Start by peeling your potatoes and cutting them into even rounds.
2. **Simmer**: Briefly heat the potato slices in a blend of warm milk and cream.
3. **Arrange**: Layer the warm potato slices in a buttered baking dish, alternating with shredded cheese.
4. **Bake**: Cover the dish with foil and bake until the potatoes are soft.
5. **Broil**: Take off the foil and broil the top until it turns golden brown.
6. **Rest**: Let the dish sit so the cream thickens and soaks into the potatoes.
## Ingredients for Scalloped Potatoes
For delightful scalloped potatoes, you will require these ingredients:
– **Potatoes**: Yukon Gold or Russet potatoes are perfect for their texture and taste.
– **Milk and Cream**: A mix of milk and heavy cream produces a rich sauce.
– **Garlic and Thyme**: These herbs elevate the natural flavor of the potatoes.
– **Gruyere Cheese**: Contributes a subtle cheesiness without overshadowing the dish.
## Choosing the Right Potatoes
The best contenders for scalloped potatoes include Yukon Golds and Russets:
– **Yukon Golds**: These potatoes are slightly starchy, buttery, and maintain their shape well, delivering a luxurious texture.
– **Russets**: Renowned for their fluffy and dry consistency, Russets yield a lighter, more delicate dish.
For a perfect harmony, consider utilizing a mix of both types.
## Slicing Potatoes
Aim for uniform slices of 1/8 to 1/4 inch thick. A mandoline slicer is advisable for obtaining even slices, ensuring that the potatoes cook evenly.
## Cheesy Scalloped Potatoes
There exists a debate regarding the inclusion of cheese in scalloped potatoes. While traditional recipes may omit cheese, many appreciate the additional flavor and richness it brings. This recipe achieves a balance, incorporating cheese without overshadowing the potato essence.
## Tips and Tricks
– **Warm the Cream**: Heating the milk and cream with the potatoes assists in thickening the sauce and guarantees even cooking.
– **Use a Shallow Dish**: A shallow baking dish permits the tops of the potatoes to brown exquisitely.
– **Let it Rest**: Allowing the dish to rest post-baking aids the sauce in thickening and the flavors in blending.
## Make Ahead and Storage
Scalloped potatoes can be prepared ahead of time. You can assemble the dish and refrigerate it until ready to bake or bake it beforehand and reheat it in the oven. Store any leftovers in the fridge for up to five days.
## Serving Suggestions
Scalloped potatoes pair delightfully with a range of main dishes, such as roasted meats, grilled chicken, or even a hearty vegetarian main. Their creamy consistency and abundant flavor render them a versatile side that enhances many meals.
In summary, scalloped potatoes are a timeless comfort dish that brings warmth and joy to any table. With their creamy sauce and tender layers, they are certain to be a favorite at your next gathering.

Easy and Tasty Chickpea Salad Sandwich Recipe
**Elevating Your Chickpea Salad: Suggestions and Dill Pickle Variation**
Chickpea salads are an adaptable and healthy choice for meals, providing a substantial foundation that can be tailored with diverse flavors and components. Whether utilizing canned or home-cooked chickpeas, grasping the distinctions of each can enhance your dish.
**Incorporating Cooked Chickpeas:**
When selecting canned chickpeas, it’s essential to recognize that they usually have added salt. To rectify this, mix in a few dashes of kosher salt according to your taste. This guarantees that the flavors are balanced and not excessively salty. Moreover, canned chickpeas often possess a softer consistency compared to those prepared at home. Chickpeas cooked at home may be drier, necessitating the addition of more mayonnaise to achieve the aimed creaminess in your salad.
**Dill Pickle Variation:**
For those eager to introduce a zesty twist to their chickpea salad, the dill pickle variation is an enjoyable choice. To create this version, add the following components:
– ½ cup diced dill pickles: These provide a crispy texture and an explosion of zesty flavor.
– 1 spoonful sweet pickle relish: This element brings a touch of sweetness, counterbalancing the tang of the dill pickles.
– ¼ teaspoon dried dill: This herb amplifies the overall dill taste, offering a fresh and fragrant accent.
– ½ tablespoon chopped dill: Fresh dill heightens the herbal nuances, making the salad more lively.
By adding these elements, you craft a chickpea salad that is not only tasty but also layered with various textures and flavors. Whether savored as a standalone meal or as a stuffing for sandwiches and wraps, this dill pickle variation is bound to be a favorite among many.
Read More
Light and Breezy Gluten-Free Chocolate Chip Cookies: A Low-Calorie Treat
Title: Airy and Light Gluten-Free Chocolate Chip Cookies: A Low-Calorie Treat
Introduction
For those adhering to a gluten-free lifestyle, locating the ideal chocolate chip cookie recipe can prove challenging. A considerable number of gluten-free cookies tend to be heavy or crumbly, but there’s no need for concern! This article introduces a recipe for light and airy gluten-free chocolate chip cookies that are not only scrumptious but also low in calories. These cookies are ideal for indulging your sweet cravings without neglecting your dietary requirements.
The Benefits of Going Gluten-Free
Gluten-free diets have gained popularity, not only among those with celiac disease or gluten intolerance but also for individuals pursuing a healthier lifestyle. Gluten-free baking frequently entails the use of alternative flours like almond, coconut, or rice flour, which can provide added nutritional advantages over conventional wheat flour. These flours are generally richer in protein and fiber, enhancing the overall satisfaction and nutrition of the treat.
The Key to Airy and Light Cookies
To achieve a light and airy consistency in gluten-free cookies, several important techniques and ingredients are necessary. Here are some suggestions to help your cookies turn out perfectly:
1. **Employ a Flour Mix**: Blending various gluten-free flours can imitate the texture of wheat flour. A combination of almond flour, tapioca starch, and coconut flour is effective in producing a well-balanced, airy texture.
2. **Add Leavening Agents**: Baking soda and baking powder play a crucial role in enabling the cookies to rise and become fluffy. Be sure they are fresh for optimal results.
3. **Beat the Egg Whites**: Separating the egg whites and beating them to soft peaks before gently folding them into the batter can infuse extra airiness into the cookies.
4. **Refrigerate the Dough**: Allowing the dough to chill for at least 30 minutes prior to baking assists the cookies in maintaining their shape and stopping excessive spreading.
Low-Calorie Ingredients
To ensure these cookies remain low in calories, consider the following ingredient swaps:
– **Sweetener Alternatives**: Use a natural sweetener such as stevia or erythritol instead of conventional sugar to lower the calorie count without losing sweetness.
– **Dark Chocolate Chips**: Choose dark chocolate chips, which contain less sugar and are richer in antioxidants than milk chocolate.
– **Unsweetened Applesauce**: Substitute some of the butter with unsweetened applesauce to reduce fat and calorie content while preserving moisture.
Recipe: Airy and Light Gluten-Free Chocolate Chip Cookies
Ingredients:
– 1 cup almond flour
– 1/4 cup tapioca starch
– 2 tbsp coconut flour
– 1/2 tsp baking soda
– 1/2 tsp baking powder
– 1/4 cup unsweetened applesauce
– 1/4 cup butter, softened
– 1/3 cup erythritol or preferred sweetener
– 1 tsp vanilla extract
– 2 large eggs, separated
– 1/2 cup dark chocolate chips
Instructions:
1. Preheat the oven to 350°F (175°C) and prepare a baking sheet with parchment paper.
2. In a bowl, combine almond flour, tapioca starch, coconut flour, baking soda, and baking powder.
3. In another bowl, cream together the butter, applesauce, erythritol, and vanilla extract until smooth.
4. Mix the egg yolks into the butter mixture thoroughly.
5. Gradually mix the dry ingredients into the wet ingredients until combined.
6. In a separate bowl, beat the egg whites until soft peaks form. Gently fold them into the cookie dough.
7. Mix in the dark chocolate chips.
8. Chill the dough in the refrigerator for 30 minutes.
9. Scoop tablespoon-sized portions of dough onto the lined baking sheet, leaving about 2 inches of space between them.
10. Bake for 10-12 minutes, or until the edges turn golden brown.
11. Let the cookies cool on the baking sheet for a few minutes before moving them to a wire rack to cool completely.
Conclusion
These light and airy gluten-free chocolate chip cookies are a delightful option for anyone wanting to relish a classic dessert without gluten or extra calories. With the right mix of ingredients and methods, you can create cookies that are both fulfilling and guilt-free. Savour these cookies with a glass of almond milk or a cup of tea for the perfect snack or dessert.
Read More
Make-Ahead Holiday Snack Recipe That Caters to Every Palate
# Marinated Mozzarella Balls: Simple Entertaining
Prepared in advance and devoured in moments, marinated mozzarella balls are a wonderful enhancement to any event. These tasty morsels can be made the evening prior, allowing entertaining to feel seamless. Present them on festive grazing platters or as a garnish for salads and crostini, and remember to save the delectable oil for dipping!
## Flavor Profile
These mozzarella balls are smooth and comforting, infused with herbal notes, lots of garlic, and a gentle zing from vinegar.
## Serving Suggestions
– Present at room temperature on a **festive board**.
– Use as a garnish for **salads** or **crostini**.
– Package in an **8-ounce mason jar** for accessible gifting, tied with twine and marked with a note to “Keep refrigerated and consume within 2 days.”
## Selecting the Best Ingredients
– **Mozzarella Balls**: Choose bocconcini or ciliegine for bite-sized pieces. Larger balls can be halved, or opt for cubed feta or provolone for variety.
– **Roasted Red Peppers**: Use jarred ones for convenience or create your own for a fresher flavor. Consider adding olives or artichoke hearts for a Mediterranean flair.
– **Marinade**: Extra virgin olive oil delivers rich taste. Both white and red wine vinegar contribute brightness and balance.
– **Seasonings**: Italian seasoning provides a savory foundation. Garlic powder is handy, but fresh minced garlic can elevate the flavor.
– **Variations**: Incorporate red pepper flakes for heat, lemon zest for freshness, or a drizzle of balsamic vinegar for added flavor.
## How to Prepare Marinated Mozzarella Balls
1. Mix the marinade ingredients (see complete recipe below).
2. Pour the marinade over the mozzarella and refrigerate to marinate.
**Tip**: For optimal flavor, allow the mozzarella to marinate for at least 24 hours, turning occasionally. Bring to room temperature before serving to liquefy the olive oil.
## Storage & Leftover Ideas
Keep prepared mozzarella balls in an airtight container in the refrigerator for up to 48 hours. Let them rest at room temperature for 30 minutes before serving.
**Note**: Do not freeze, as this will change the cheese’s texture and oil emulsion.
## Recipe Overview
– **Servings**: 8
– **Prep Time**: 10 minutes
– **Marinating Time**: 1 day
– **Total Time**: 1 day, 10 minutes
### Ingredients
– Mozzarella balls
– Olive oil
– White wine vinegar
– Roasted red peppers
– Fresh parsley
– Italian seasoning
– Garlic (fresh or powder)
– Red pepper flakes
– Salt
### Instructions
1. Place mozzarella in a 2-cup mason jar.
2. Combine olive oil, vinegar, roasted red peppers, parsley, Italian seasoning, garlic, red pepper flakes, and salt in a measuring cup, then pour over mozzarella.
3. Seal the jar and shake well to combine.
4. Refrigerate immediately and marinate for 24 hours, turning the jar occasionally.
### Notes
– Fresh garlic and herbs can be substituted for dried.
– Store the oil for a maximum of 48 hours for safety.
– Sliced fresh mozzarella or cubed pizza mozzarella may also be utilized.
Savor these marinated mozzarella balls as a straightforward yet sophisticated enhancement to your next event!
Read More
Cornbread Casserole: An Ideal Festive Accompaniment Straight from the Oven
# Cornbread Casserole: A Heartwarming Classic Crafted from Scratch
Cornbread casserole is a cherished meal that brings warmth and solace to any dining experience. With its soft center and lightly crunchy edges, this recipe offers a delightful way to savor cornbread without relying on a packaged mix. Made with straightforward pantry staples, it’s ideal for both regular dinners and festive gatherings.
## Flavor Characteristics
This cornbread casserole is moist, tasty, and has a hint of sweetness. The mix of creamed corn and cheese results in a melt-in-your-mouth consistency, while the golden-brown topping provides an inviting look.
## Necessary Tools
For optimal results, utilize a **9×13 casserole dish**. This size guarantees that the edges get lightly crisp while the middle stays soft.
## Serving Ideas
Cornbread casserole makes a wonderful side dish for holiday feasts. It complements wonderfully with:
– [Brown Sugar Ham](https://www.spendwithpennies.com/baked-ham-with-brown-sugar-glaze/)
– [Slow Cooker Turkey Breast](https://www.spendwithpennies.com/crock-pot-turkey-breast/)
– [Chili](https://www.spendwithpennies.com/texas-chili/)
## Pantry Corn Enchantment
### Key Ingredients
– **Corn**: The highlight of this dish. Utilize a mix of creamed corn and canned corn, or swap canned corn with 1½ cups of thawed frozen corn.
– **Cheese**: While sharp cheddar is typical, Monterey Jack may also be used, or for a spicy twist, opt for Pepper Jack and incorporate diced jalapeños.
– **Cornmeal**: Crucial for that traditional cornbread taste. Medium-grind cornmeal is suggested for the finest texture.
– **Sour Cream**: Introduces a tangy taste and contributes to moisture. If sour cream isn’t available, full-fat Greek yogurt is an acceptable alternative.
– **Variations**: For a smoky essence, include some cooked bacon and a dash of smoked paprika. You can also add chives or green onions for a savory note, or create a green chile casserole by adding green chiles and cumin.
## How It All Comes Together
1. Preheat the oven to 350°F and grease your casserole dish.
2. In a bowl, whisk the dry ingredients: flour, cornmeal, sugar, baking powder, and salt together.
3. In a separate bowl, combine the wet ingredients: creamed corn, sour cream, melted butter, and eggs.
4. Mix the wet and dry ingredients together, stirring just until mixed. Gently fold in corn kernels and cheese if desired.
5. Pour the batter into the greased baking dish and bake for 45-55 minutes, or until lightly golden.
### Success Tips
– For a more tender texture, allow the batter to rest for 5 minutes before baking.
– Modify sweetness by adding 1-2 tablespoons of sugar and consider including a pinch of garlic powder for added flavor.
– The casserole is finished when the center has slight jiggle and reaches about 200°F on an instant-read thermometer.
– To prep in advance, keep dry and wet ingredients apart for up to 24 hours. Combine prior to baking.
– For a half batch, use an **8×8 casserole dish** and begin checking for doneness around 35-40 minutes.
## Save for Later
Allow any leftovers to cool thoroughly and place them in an airtight container in the refrigerator for up to 4 days. For extended storage, freeze for up to 2 months. When ready to re-enjoy, heat covered at 325°F until warmed through, then uncover for a few minutes to refresh the edges.
## Conclusion
This cornbread casserole is more than just a meal; it’s a soothing classic that can be savored all year round. With its uncomplicated ingredients and straightforward preparation, it’s bound to become a favorite at your table. Relish the cozy flavors and the joy of sharing this delightful dish with loved ones!
Read More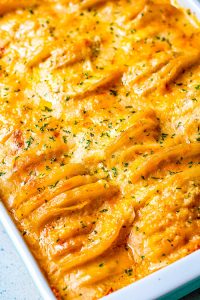
Recipe for Scalloped Potatoes Baked
# Scalloped Potatoes: A Timeless Comfort Dish
Scalloped potatoes are a cherished side that is celebrated for its rich, creamy consistency and soothing tastes. Frequently served with substantial cuts of meat, they are a mainstay at family reunions and festive celebrations. Their indulgent quality allows them to be enjoyed on their own, providing a delightful experience of soft potatoes swathed in a silky cream sauce, often crowned with a golden layer of cheese.
## What are Scalloped Potatoes?
Scalloped potatoes fall under the category of gratin, distinguished by thinly sliced potatoes baked in a creamy sauce. The term “scalloped” refers to the dish’s stacked appearance, reminiscent of scallops. This distinct texture, similar to a potato lasagna, is what renders scalloped potatoes so attractive.
## How to Make Scalloped Potatoes
Preparing scalloped potatoes is surprisingly easy, necessitating just a few steps:
1. **Peel and Slice**: Start by peeling your potatoes and cutting them into even rounds.
2. **Simmer**: Briefly heat the potato slices in a blend of warm milk and cream.
3. **Arrange**: Layer the warm potato slices in a buttered baking dish, alternating with shredded cheese.
4. **Bake**: Cover the dish with foil and bake until the potatoes are soft.
5. **Broil**: Take off the foil and broil the top until it turns golden brown.
6. **Rest**: Let the dish sit so the cream thickens and soaks into the potatoes.
## Ingredients for Scalloped Potatoes
For delightful scalloped potatoes, you will require these ingredients:
– **Potatoes**: Yukon Gold or Russet potatoes are perfect for their texture and taste.
– **Milk and Cream**: A mix of milk and heavy cream produces a rich sauce.
– **Garlic and Thyme**: These herbs elevate the natural flavor of the potatoes.
– **Gruyere Cheese**: Contributes a subtle cheesiness without overshadowing the dish.
## Choosing the Right Potatoes
The best contenders for scalloped potatoes include Yukon Golds and Russets:
– **Yukon Golds**: These potatoes are slightly starchy, buttery, and maintain their shape well, delivering a luxurious texture.
– **Russets**: Renowned for their fluffy and dry consistency, Russets yield a lighter, more delicate dish.
For a perfect harmony, consider utilizing a mix of both types.
## Slicing Potatoes
Aim for uniform slices of 1/8 to 1/4 inch thick. A mandoline slicer is advisable for obtaining even slices, ensuring that the potatoes cook evenly.
## Cheesy Scalloped Potatoes
There exists a debate regarding the inclusion of cheese in scalloped potatoes. While traditional recipes may omit cheese, many appreciate the additional flavor and richness it brings. This recipe achieves a balance, incorporating cheese without overshadowing the potato essence.
## Tips and Tricks
– **Warm the Cream**: Heating the milk and cream with the potatoes assists in thickening the sauce and guarantees even cooking.
– **Use a Shallow Dish**: A shallow baking dish permits the tops of the potatoes to brown exquisitely.
– **Let it Rest**: Allowing the dish to rest post-baking aids the sauce in thickening and the flavors in blending.
## Make Ahead and Storage
Scalloped potatoes can be prepared ahead of time. You can assemble the dish and refrigerate it until ready to bake or bake it beforehand and reheat it in the oven. Store any leftovers in the fridge for up to five days.
## Serving Suggestions
Scalloped potatoes pair delightfully with a range of main dishes, such as roasted meats, grilled chicken, or even a hearty vegetarian main. Their creamy consistency and abundant flavor render them a versatile side that enhances many meals.
In summary, scalloped potatoes are a timeless comfort dish that brings warmth and joy to any table. With their creamy sauce and tender layers, they are certain to be a favorite at your next gathering.
Read More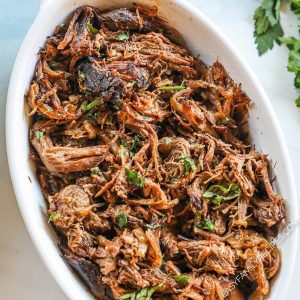
Tender French Onion Pot Roast with Delectable Gravy Recipe
# Slow Cooker Pot Roast with French Onion Gravy
This slow cooker pot roast recipe is a wonderful fusion of tastes, showcasing a tender chuck roast and caramelized onions that blend into a robust, savory French onion gravy. Accompanied by creamy mashed potatoes and cheesy toasts, this meal elevates a regular dinner into a memorable event.
## Flavor Profile
The secret to the delectable nature of this pot roast lies in the caramelized onions, seasonings, and beef drippings that craft a deeply flavored onion gravy. Drawing inspiration from traditional French onion soup, we present this dish with cheesy toasts that enhance the savory elements of the roast.
## Cooking Method
### Slow Cooker Setting
For the best tenderness, it is advisable to cook the chuck roast on the low setting. Utilizing high can lead to a tougher roast, as the low and slow technique ensures the meat breaks down appropriately.
### Serving Suggestions
This pot roast shines when served over smooth mashed potatoes, egg noodles, or rice, lavishly drizzled with gravy. It also pairs effectively with roasted baby red potatoes or a variety of roasted vegetables.
## Ingredient Tips
– **Onions**: Opt for yellow onions for a traditional flavor; refrain from using sweet onions, as they may overly sweeten the gravy.
– **Dry White Wine**: Contributes depth to the flavor and aids in deglazing the skillet. If desired, replace it with extra broth.
– **Beef Roast**: Chuck roast is excellent for slow cooking due to its tenderness. Alternatives include round roast or rump roast, but steer clear of lean cuts.
– **Beef Stock or Broth**: Stock yields a richer gravy, but broth works as a suitable substitute. Choose low-sodium versions if preferred.
## Variations
– Sauté mushrooms alongside the onions for extra flavor.
– To achieve neatly sliced roast, tie the roast with kitchen twine prior to searing and keep it tied during the cooking process.
– Amplify the flavor with a bouquet garni of fresh herbs such as parsley, thyme, or rosemary.
## How to Make a Slow Cooker Pot Roast
1. **Sear the Roast**: Season and sear the roast in a skillet, then position it in the slow cooker.
2. **Caramelize Onions**: Sauté onions and garlic until soft, deglaze with wine, and pour over the roast.
3. **Add Ingredients**: Mix in the remaining ingredients and cook on low.
4. **Finish and Serve**: Allow the roast to rest, thicken the gravy, and serve it over mashed potatoes with cheesy toasts alongside.
### Prep Tips
– Prepare cheesy toasts up to 48 hours prior and reheat before serving.
– Caramelize onions up to 3 days ahead of time.
– Combine gravy ingredients earlier for easier preparation.
### Storage Tips
– **Leftovers**: Keep cooked pot roast in gravy in an airtight container in the fridge for 3–4 days.
– **Freezing**: Freeze in gravy for 2–3 months for optimal quality.
– **Reheating**: Heat on the stovetop with a splash of broth or microwave in short spurts.
## Conclusion
This slow cooker pot roast is ideal for hectic weeknights while still offering the essence of a special meal. With its rich flavors and comforting sides, it is bound to become a family favorite. Relish the process of crafting this delightful dish, and enjoy the flavorful outcome!
Read More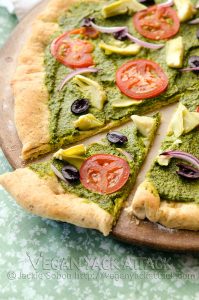
Pizza topped with Pesto Sauce
How about having pizza for dinner? It’s difficult to surpass the timeless pesto pizza. This straightforward vegetarian pizza recipe is sure to please a crowd. It brings together an enticing mix of fresh, vibrant flavors from the basil pesto and tomatoes, lots of cheesy mozzarella, and a crust that bubbles with a satisfying chew.
This hassle-free pesto pizza recipe comes together swiftly with the assistance of your food processor. You can mix the dough and pesto in around 15 minutes—just clean the processor in between the two parts. If you’re in search of a really effortless weeknight dinner that’s superior to takeaway, consider using pre-made dough and pesto!
Pesto Pizza Ingredients & Topping Suggestions
Here’s what you’ll require to prepare this pizza:
Pizza dough
As always, I began with my go-to Whole Wheat Pizza Dough Recipe, which is simple to whip up. I suggest using white whole wheat flour, now known as Golden Whole Wheat by King Arthur, so the flavor of the whole wheat doesn’t overpower the vibrant pesto. The recipe is also compatible with all-purpose flour.
Switch it up: Use your preferred pizza dough recipe that yields approximately one pound of dough. Store-bought pizza dough is fine, too—just adhere to the package’s directions for allowing it to rise at room temperature, if required.
Pesto
This recipe provides steps for creating basil pesto from scratch. It requires fresh basil, pine nuts, Parmesan, lemon juice, garlic, and olive oil.
Switch it up: You can replace the pine nuts with another type of nut like almonds, walnuts, pecans, or pepitas. Alternatively, arugula can be used in place of basil, which is often more cost-effective and readily available throughout the year.
Mozzarella cheese
Mozzarella is ideal for pesto pizza. I loved the results with mini fresh mozzarella balls, known as ciliegene, which are perfectly sized for dotting your pizzas. You can also use larger mozzarella balls, torn into one-inch chunks. The secret to making excellent pizzas with fresh, water-laden mozzarella balls is to gently pat the cheese dry before topping your pizza to prevent excess moisture.
Switch it up: You can also opt for grated part-skim mozzarella for delightful results. I slightly favored the texture of the fresh mozzarella and loved how the green color of the pesto came through.
Toppings
Tomatoes are the traditional option. I recommend cherry tomatoes, which are less watery and generally more flavorful throughout the year. They bake best on pizzas when halved lengthwise, which facilitates even distribution across the pizzas and provides ample surface area for roasting off any excess juice.
Switch it up: You can completely exclude the tomatoes, or swap them for other thinly sliced vegetables like bell pepper, marinated artichoke, olives, mushrooms, or zucchini or yellow squash (cut as suggested). Well-drained, oil-packed sun-dried tomatoes would add extra flavor.
What to Serve with Pesto Pizza
If you’re planning your meal around pesto pizza as the main dish, you can’t go wrong. Pesto pizza pairs wonderfully with many other fresh, herb-forward dishes. Here are my top recommendations categorized by type.
More Recipes Featuring Pesto
Pesto is one of my go-to sauces! Here are a few more standout recipes with pesto on Cookie and Kate:
Please share how your pesto pizza turns out in the comments. I enjoy hearing from you.
Pesto Pizza
This traditional pesto pizza recipe showcases basil pesto, mozzarella, and tomato! It’s simple to prepare from scratch. Store-bought ingredients work well, too. Recipe makes two medium pizzas.
Dough and toppings
Pesto (or swap for 1 cup store-bought)
Preheat the oven to 500°F with a rack in the upper third of the oven. (Or, if you’re using a pizza stone, ensure it’s in the oven on the right rack. Check the manufacturer’s instructions.) Prepare the pizza dough as instructed, rolling it out as thinly as possible, but don’t brush the edges with oil (you don’t need it for this recipe due to the oil content of the pesto). Clean the food processor bowl thoroughly and return it to the machine.
To create the pesto: In the food processor, blend the basil (set aside a small handful of the most beautiful smaller leaves for garnish), nuts, Parmesan, lemon juice, garlic, and salt. With the machine in operation, drizzle in the olive oil. Keep processing until the mixture is well combined, stopping to scrape down the sides when necessary.
To top the pizzas: Spread each pizza with half of the pesto, leaving about 1 inch of bare dough around the edges. If you’re using fresh mozzarella, drain it thoroughly and gently pat it dry on a clean tea towel or paper towels (for larger mozzarella balls, tear them into 1-inch pieces). Evenly distribute half of the mozzarella and sliced tomatoes over each pizza.
Transfer one pizza (including the parchment paper) onto a baking sheet and into
Read More
60 Tasty Suggestions for Your Christmas Feast
Alex & Sonja: The Culinary Team Behind A Couple Cooks
Introducing Alex and Sonja Overhiser, the energetic pair responsible for the beloved culinary site, A Couple Cooks. As the authors of two renowned cookbooks and busy parents, Alex and Sonja have perfected the skill of harmonizing family responsibilities with their enthusiasm for cooking. Their adventure commenced in 2010 when they established A Couple Cooks to express their affection for straightforward, seasonal recipes and the delight that cooking can infuse into daily life.
Over time, A Couple Cooks has transformed into an extensive resource for home chefs, featuring thousands of unique recipes, valuable cooking insights, and actionable meal planning ideas. Each recipe is carefully designed and photographed by Alex and Sonja, ensuring that their individual flair is apparent in every creation. Their dishes have been tested not only in their own kitchen but also by their children, making them approachable and suitable for cooks across all experience levels.
Alex and Sonja’s guiding principle revolves around the belief that cooking should be straightforward and enjoyable for everyone. They highlight the importance of using fresh, seasonal ingredients to craft meals that are both healthful and delightful. Their website showcases a broad array of recipes, ranging from quick weeknight meals to intricate dishes for special events, accommodating various tastes and dietary needs.
In addition to their digital platform, Alex and Sonja have written two cookbooks that further highlight their culinary knowledge and creativity. These volumes are brimming with recipes that demonstrate their dedication to simplicity and flavor, motivating readers to experiment with new ingredients and methods in their kitchens.
Beyond just recipes, A Couple Cooks provides essential cooking advice and meal planning tactics that assist readers in optimizing their kitchen time. Alex and Sonja recognize the hurdles of balancing busy lives and strive to offer solutions that render home cooking more achievable and pleasurable.
Through A Couple Cooks, Alex and Sonja have cultivated a lively community of food lovers who share their zeal for cooking and healthy eating. Their authentic approach and commitment to excellence have garnered them a devoted audience, making them a reliable source of culinary inspiration.
Whether you are an experienced chef or beginning your culinary path, Alex and Sonja Overhiser welcome you to join them in experiencing the joy of cooking. With their mentorship, you’ll discover that making delicious meals at home can be both fulfilling and enjoyable.
Read More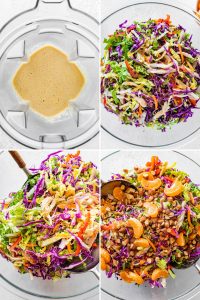
Winter Cabbage Salad with Mandarins and Cashews
### Winter Cabbage Salad with Mandarins and Cashews
As the festive season draws near, many of us become absorbed in the pleasures of baking and creating celebratory dishes. Yet, amidst the lavishness of treats and decadent meals, there might come a moment when your body seeks something crisp and colorful. This is where the Winter Cabbage Salad with Mandarins and Cashews shines—a charming mix of flavors and textures that is both invigorating and fulfilling.
#### Ingredients
**Spiced Cashews:**
– 1 cup (115 grams) cashews
– 2 tablespoons (25 grams) dark brown sugar
– 1/2 teaspoon kosher salt
– 1/4 teaspoon ground cayenne
– 1/2 teaspoon smoked paprika
**Salad Assembly:**
– 1 pound (455 grams) red cabbage, thinly sliced or shredded (approximately 4 cups)
– 1 small or half a large fennel bulb, halved and thinly sliced (around 1 cup)
– 3 regular or 4 thin scallions, finely sliced (both green and white parts)
– A small handful of fresh mint leaves, thinly julienned
– 3 mandarins (clementines or other small oranges), separated
– 2 tablespoons (30 ml) white wine vinegar
– 1 teaspoon kosher salt
– Freshly ground black pepper
– 1 teaspoon sumac, plus extra for finishing
– Spiced cashews (from above)
#### Instructions
**Make the Spiced Cashews:**
1. Preheat your oven to 400°F (200°C).
2. Wash the cashews in a colander without shaking off any excess water. This moisture helps the spices stick.
3. In a bowl, mix the cashews with dark brown sugar, kosher salt, cayenne, and smoked paprika. Stir until thoroughly coated. If the mixture seems dry, add a teaspoon of water.
4. Spread the cashews on a parchment-lined baking sheet and roast for 8 to 10 minutes, or until they turn darker and slightly toasted. For a crunchier texture, you can roast them for an additional 3 to 5 minutes, but keep an eye on them to avoid burning. Let them cool completely.
**Assemble the Salad:**
1. In a large bowl, mix the red cabbage, fennel, scallions, and mint.
2. Juice one of the mandarins and pour 2 tablespoons of the juice into a small bowl. (Any leftover juice can be enjoyed as a refreshing shot.)
3. To the juice, add white wine vinegar, kosher salt, freshly ground black pepper, and sumac. Whisk to combine.
4. Drizzle the dressing over the cabbage mixture and toss to mix. Taste and modify seasoning as necessary. If you prepare this in advance, the mixture can marinate for a few hours without getting mushy.
5. Peel the remaining mandarins and separate them into segments. Layer half of the dressed salad mixture on a serving plate, then add half of the mandarin segments and half of the spiced cashews. Repeat with the remaining components.
6. Serve right away and savor the delightful crunch and vivid flavors.
#### Conclusion
This Winter Cabbage Salad with Mandarins and Cashews is not only a visual treat but also an excellent addition to any holiday gathering, pairing beautifully with classic dishes such as latkes or substantial braises. It can also act as a refreshing brunch choice or a personal delight during the bustling season. The mix of crunchy cabbage, sweet mandarins, and spiced cashews creates a gratifying dish that is bound to become a favorite. Relish the explosion of flavors and the invigorating crunch that this salad brings to your winter dining.
Read More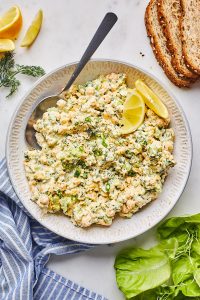
Easy Canned Chickpeas Recipe
Here’s a quick way to prepare canned chickpeas in just 5 minutes for a tasty plant-based protein option! This straightforward canned chickpea recipe serves as a versatile ingredient ideal for grain bowls, salads, and speedy dinners.
Do you want to discover one of my favorite cooking hacks? These simple canned chickpeas will demonstrate how to elevate a plain can of beans into something extraordinary in just 5 minutes!
This recipe is among my top strategies for enjoying healthy plant-based dinners. Honestly, I don’t follow recipes every night. Many evenings, I whip up improvised meals using what I can find in the pantry or fridge, complemented by these easy chickpeas! They’re fantastic for nutritious lunches or as the protein in a grain bowl. Honestly, I could label these as lifesaver chickpeas.
5 Ingredients for This Canned Chickpeas Recipe
Not everyone is aware of how to make chickpeas flavorful. In fact, several people have mentioned that they can’t handle the taste or texture of chickpeas. So here’s a tip to impress those who aren’t fans of chickpeas. It only takes 5 minutes and it transforms the flavor! Here’s what you’ll need to cook canned chickpeas quickly:
– Canned chickpeas: Canned chickpeas are a pantry essential for us: we stock up on them! You can also utilize cooked chickpeas, naturally. Avoid reduced sodium varieties, as they are generally quite bland.
– Fresh garlic: If you’re in a bind, you can substitute with ¼ teaspoon garlic powder. However, fresh garlic provides the best instant flavor.
– Smoked paprika: The smoked Spanish type of paprika contributes the perfect smoky flavor. Use standard paprika if you’re unable to find it.
– Olive oil and salt: Complete the seasoning.
5 Star Reader Review
⭐⭐⭐⭐⭐ “Incredible – just like it was described, this recipe turned a can of chickpeas into a delicious, healthy side dish in 5 minutes. I added cayenne pepper, cilantro, and a generous squeeze of lemon. I plan to experiment with more spices next time!” -Kin
How to Cook Canned Chickpeas
Once your ingredients are ready, it’s a breeze to cook the canned chickpeas. It really takes only 5 minutes. Here’s what you need to do:
1. Mince the garlic. The only cutting necessary is to mince a single garlic clove.
2. Sauté the garlic in olive oil for 1 minute. Cook until fragrant and sizzling beautifully, but before it turns brown. This should take about 30 seconds to 1 minute.
3. Add the canned chickpeas, smoked paprika, and salt; cook for 2 minutes. Heat just until they are warmed through. You’ll be surprised by the rich flavor developed in just a few minutes of cooking.
Scaling for Meal Prep
This recipe is designed for 1 can of canned chickpeas. The number of servings depends on how you plan to serve it. The can usually states it contains 3 servings per container. However, if you’re using it as your main plant-based protein, you might need around 2 servings per container to feel satisfied.
Preparing a meal for four? Simply double this recipe! It also keeps nicely in the refrigerator for 2 to 3 days, allowing you to prepare a larger batch and reheat for meals throughout the week.
Serving Suggestions
There are countless ways to enjoy these canned chickpeas for a quick lunch or dinner! Here are some serving ideas:
– With pita triangles & fresh veggies. Slice pita bread into triangles, then add sliced tomatoes and cucumbers with a dash of salt. Elevate it by adding feta cheese.
– As a grain bowl. Combine quinoa or rice, fresh vegetables, kalamata olives, and tahini sauce. Instant Greek bowl!
– With roasted veggies. Roast some vegetables and include these chickpeas as the protein source.
– Over a sweet potato. Bake a sweet potato, then top with tahini sauce along with fresh dill and parsley.
– Chickpea Caesar salad. Incorporate these into a classic Caesar salad for a vegetarian meal.
Nutritional Benefits
Why include canned chickpeas in your diet? This powerful legume is packed with beneficial nutrients. Here are some reasons to appreciate the garbanzo bean:
– High in plant-based protein. 1 cup provides 14.5 grams of protein, which is about 30% of your daily protein needs.
– Excellent fiber source. 1 cup also contains 12.5 grams of fiber, fulfilling about 50% of your daily requirement.
– Can aid in weight management. Chickpeas are low in calorie density, supplying few calories relative to their nutrient content. Their high protein and fiber content also enhance satiety and reduce calorie intake during meals.
Storage and Serving Tips
Leftovers can be stored in the refrigerator for up to 3 days.
Read More